Gutter Guard Installation: Step-by-Step Metal Roof Instructions for Geelong Homes
Gutter guards are an essential addition to any home with a metal roof in Geelong, where unpredictable weather can lead to debris accumulation and potential damage. In this comprehensive guide, we’ll walk you through the step-by-step process of installing gutter guards on your metal roof. This guide is designed to be the ultimate resource, providing you with everything you need to know, from the tools required to the final installation touches.
Why Is Gutter Guard Installation Useful?
Gutter guards are critical in protecting your home from water damage, reducing the need for frequent gutter cleaning, and preventing blockages that can lead to costly repairs. In areas like Geelong, where seasonal changes bring a mix of leaves, twigs, and other debris, gutter guards ensure that your gutters remain clear and functional all year round.
Source: https://aussiediysolutions.com/
Key Benefits of Gutter Guard Installations:
- Prevent Blockages: Stop leaves and debris from clogging your gutters.
- Reduce Maintenance: Minimize the need for regular gutter cleaning.
- Extend Gutter Life: Protect your gutters from rust and corrosion by keeping them clear of debris.
- Improve Water Flow: Ensure efficient water flow during heavy rains, preventing overflow and potential damage to your home’s foundation.
Tools and Materials Needed
Before starting the installation, ensure you have all the necessary tools and materials. Having everything on hand will make the process smoother and quicker.
Tools Required:
- Ladder: A sturdy ladder that can safely reach your gutters.
- Cordless Drill: Essential for securing the gutter guards in place.
- Screws: Stainless steel screws are recommended to avoid rusting.
- Metal Snips: For cutting the gutter guard material to the appropriate size.
- Gloves: Protect your hands from sharp edges and debris.
- Measuring Tape: To measure the length of your gutters accurately.
- Pencil or Chalk: For marking where cuts and screws will go.
- Safety Glasses: Protect your eyes from debris while working.
Materials Needed:
- Gutter Guards: Choose high-quality metal mesh gutter guards designed for metal roofs.
- Gutter Screws: Stainless steel screws that are compatible with your metal roof.
- Roof Sealant (Optional): To seal any gaps between the gutter guards and the roof.
Step-by-Step Installation Process
Step 1: Measure Your Gutters
Start by measuring the length of your gutters to determine how much gutter guard material you will need. Use a measuring tape to get the exact length, and ensure you have a little extra for any adjustments during installation.
Step 2: Clean the Gutters
Before installing the gutter guards, make sure your gutters are clean. Remove any leaves, twigs, or debris that may have accumulated. This step is crucial because installing gutter guards over debris can cause blockages and reduce the effectiveness of the guards.
Step 3: Cut the Gutter Guards to Size
Using metal snips, cut the gutter guards to fit the length of your gutters. If your gutters are curved or have corners, make sure to cut the guards accordingly to ensure a snug fit. Mark the points where you need to cut with a pencil or chalk for accuracy.
Step 4: Position the Gutter Guards
Place the gutter guards over the top of the gutter, ensuring the mesh is slightly angled to allow water to flow into the gutter while keeping debris out. Make sure the gutter guard is flush with the roof and doesn’t leave any gaps where debris could enter.
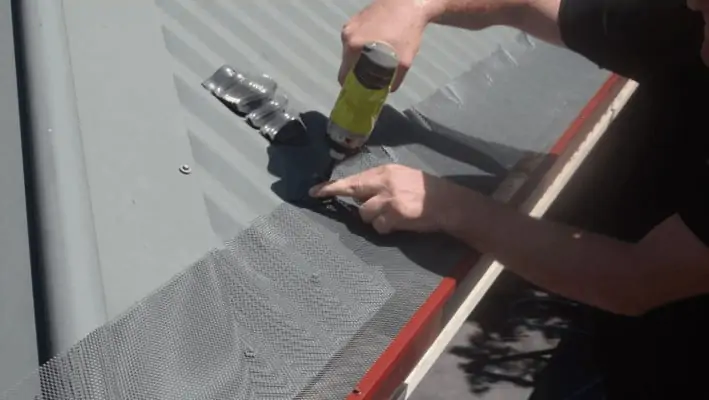
Step 5: Secure the Gutter Guards
Using your cordless drill, secure the gutter guards in place with stainless steel screws. Start at one end of the gutter and work your way to the other, making sure each section is firmly attached. Space the screws evenly, approximately every 30cm to 50cm, to ensure stability.
Step 6: Seal Any Gaps (Optional)
If there are any gaps between the gutter guard and the roof, apply a roof sealant to close them. This step is particularly important in areas prone to heavy rain or wind, as it prevents water from getting under the roof and causing damage.
Step 7: Inspect the Installation
After securing the gutter guards, inspect the installation to ensure everything is in place and functioning correctly. Check that there are no loose sections, gaps, or areas where debris could enter. If you find any issues, address them immediately to avoid future problems.
Maintenance Tips
While gutter guards significantly reduce the need for maintenance, it’s still important to check them periodically. Here are a few maintenance tips to keep your gutter guards in top condition:
- Regular Inspections: Check your gutter guards at least twice a year, preferably before and after the rainy season.
- Clear Off Debris: Remove any debris that may have accumulated on top of the gutter guards to maintain optimal water flow.
- Check for Damage: Look for any signs of wear and tear, such as rust or bent sections, and replace them as needed.
Conclusion
Installing gutter guards on your metal roof is an excellent investment in protecting your home from water damage and reducing the need for frequent gutter cleaning. By following this step-by-step guide, you can ensure a smooth and effective installation that will keep your gutters functioning correctly for years to come.